Cài đặt Ubuntu
Tải bản chính thức, hỗ trợ dài hạn Ubuntu Server 20.04.2 LTS tại https://ubuntu.com/download/server. Chú ý chọn Option 2: Manual server installation
Sau khi download xong, cài đặt máy chủ như bình thường, một số bước cần chú ý:
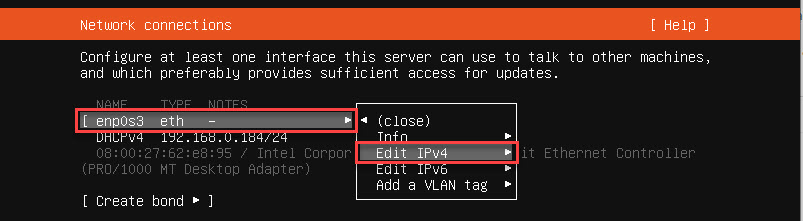
Network Connections:
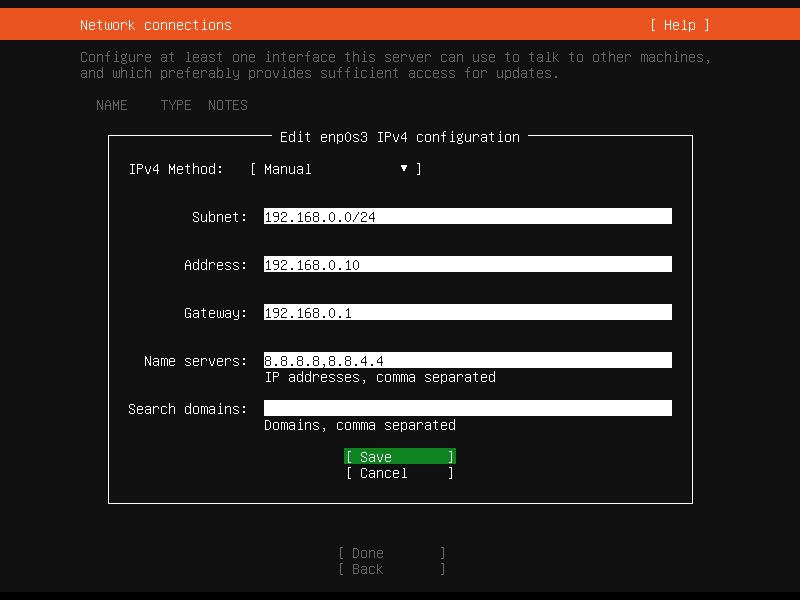
Chỉnh thành IP tĩnh thay vì mặc định IP động:
Cấu hình ví dụ như sau
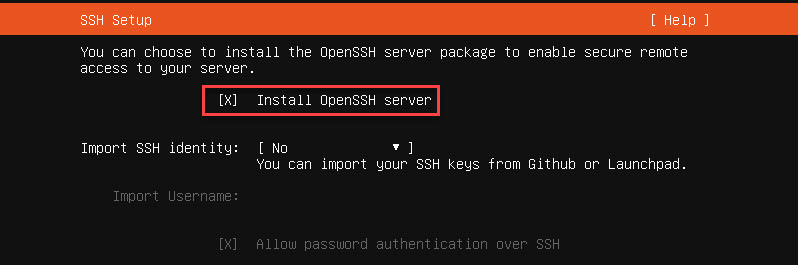
SSH Setup
Click chọn OpenSSH Server như ảnh
Chỉnh lại múi giờ
sudo timedatectl set-timezone Asia/Ho_Chi_MinhCài đặt Hestia Control Panel
Đăng nhập SSH vào server sau đó thực hiện các bước sau
- Tải về file cài đặt:
wget https://raw.githubusercontent.com/hestiacp/hestiacp/release/install/hst-install.sh - Cài đặt với lệnh:
sudo bash hst-install.shSau khi chạy lệnh đó, tiến hành theo hướng dẫn để cài đặt. Kết thúc cài đặt, hệ thống sẽ hiển thị thông tin đăng nhập hestia, tài khoản và mật khẩu. Bạn cần copy thông tin đó và lưu lại, sau đó khởi động lại máy chủ.
Các cấu hình
Cài SSL cho site quản trị Hestia Control Panel
- Cài
apt install certbot - Tạo file
/root/crontab/renew_ssl.cp.writeblabla.com.shvới nội dung
#!/bin/bash

service nginx stop
certbot certonly --standalone --agree-tos --renew-by-default --email email@gmail.com -d cp.writeblabla.com

rm -f /usr/local/hestia/ssl/certificate.crt
rm -f /usr/local/hestia/ssl/certificate.key
cp /etc/letsencrypt/live/cp.writeblabla.com/fullchain.pem /usr/local/hestia/ssl/certificate.crt
cp /etc/letsencrypt/live/cp.writeblabla.com/privkey.pem /usr/local/hestia/ssl/certificate.key

chown root:mail /usr/local/hestia/ssl/certificate.crt
chown root:mail /usr/local/hestia/ssl/certificate.key
chmod 0660 /usr/local/hestia/ssl/certificate.crt
chmod 0660 /usr/local/hestia/ssl/certificate.key

service nginx start
service hestia restart
service apache2 restart
Sau đó chạy /bin/bash /root/crontab/renew_ssl.cp.writeblabla.com.sh để cập nhật SSL lần đầu.
- Tạo cron gia hạn SSL định kỳ:
0 3 */85 * * /bin/bash /root/crontab/renew_ssl.cp.writeblabla.com.sh
Cấu hình tường lửa
Đọc lại bài viết Cài đặt và cấu hình máy chủ webserver với hệ điều hành Centos 7 và Vesta để nắm cách cài tường lửa. Đối với Hestia có một số khác biệt
Thêm các rule:
iptables -I INPUT 1 -p tcp -s 192.168.1.1/24 -m multiport --dports 21,12000:12100,22,8083 -j ACCEPT
iptables -I INPUT 2 -p tcp -s 192.168.0.1/24 -m multiport --dports 21,12000:12100,22,8083 -j ACCEPT
iptables -I INPUT 3 -p tcp -s 117.2.50.16 -m multiport --dports 21,12000:12100,22,8083 -j ACCEPT
iptables -I INPUT 4 -p tcp -m multiport --dports 21,12000:12100,22,8083 -j DROP
Xóa rule số 21 (hoặc khác nhưng nội dung như bên dưới)
ACCEPT tcp -- anywhere anywhere tcp dpt:8083Lưu cấu hình iptables ra file sau đó tạo crontab để tự động load lại vì trên Ubuntu 20.04 LTS tường lửa iptables không load lại
- Tạo thư mục:
mkdir /etc/iptables - Ghi cấu hình ra file:
iptables-save > /etc/iptables/rules.v4 - Nạp lại cấu hình:
iptables-restore < /etc/iptables/rules.v4 - Tự động nạp lại mỗi 5 phút bằng crontab:
*/5 * * * * /sbin/iptables-restore < /etc/iptables/rules.v4 > /dev/null 2>&1Giới hạn IP truy cập phpmyadmin
Mở file /etc/apache2/conf.d/phpmyadmin.conf tìm
<Directory /usr/share/phpmyadmin>Thêm xuống dưới
Order Deny,Allow
Deny from All
Allow from 117.2.50.16
Sau đó chạy systemctl restart apache2 để áp dụng
Cài đặt Dropbox để đồng bộ sao lưu lên mây
Chú ý: Không chạy bằng user root
Cài đặt:
wget -O dropbox-ubuntu.tar.gz "https://www.dropbox.com/download?plat=lnx.x86_64"
tar xzf dropbox-ubuntu.tar.gz
rm dropbox-ubuntu.tar.gz
Cài thêm các package khác cần thiết để chạy
sudo apt install libc6 libglapi-mesa libxdamage1 libxfixes3 libxcb-glx0 libxcb-dri2-0 libxcb-dri3-0 libxcb-present0 libxcb-sync1 libxshmfence1 libxxf86vm1Tự động khởi động cùng hệ thống: Chạy sudo vim /etc/systemd/system/dropbox.service rồi chép code sau vào
[Unit]
Description=Dropbox Daemon
After=network.target

[Service]
Type=simple
User=hoaquynhtim99
ExecStart=/home/hoaquynhtim99/.dropbox-dist/dropboxd
ExecStop=/bin/kill -HUP $MAINPID
Restart=always

[Install]
WantedBy=multi-user.target
Chạy Dropbox bằng lệnh sudo systemctl start dropbox. Cho phép tự chạy bằng lệnh sudo systemctl enable dropbox. Sau khi chạy dùng lệnh sudo systemctl start dropbox để xem trạng thái đăng nhập. Hệ thống sẽ hiển thị một cái link nếu chưa đăng nhập, chép link đó vào trình duyệt để đăng nhập.
Để tự động đồng bộ backup của HestiaCP vào Dropbox ta tạo ra crontab 10 4 * * * /bin/bash /root/crontab/backup_home_dir.sh nội dung file backup_home_dir.sh
#!/bin/bash

echo "Begin:"
echo ""

# Xóa các file cũ
for filepath in /home/hoaquynhtim99/Dropbox/backup-server-tandung-ubuntu2004lts/*.tar ; do
    filename="$(basename $filepath)"
    filemtime="$(date -r $filepath +%s)"
    currenttime="$(date +"%s")"
    echo "Check backed up file: $filename"
    if [ $(($currenttime - $filemtime)) -gt $((86400 * 7)) ]; then
        echo "File timeout, delete"
        rm "$filepath"
    else
        echo "Keep this file"
    fi
    echo ""
done

# Sao chép backup file sang thư mục đồng bộ
for filepath in /backup/*.tar ; do
    filename="$(basename $filepath)"
    newpath="/home/hoaquynhtim99/Dropbox/backup-server-tandung-ubuntu2004lts/$filename"
    echo "File processing: $filename"
    if [ ! -f "$newpath" ]; then
        echo "Copy to the dropbox sync folder"
        cp "$filepath" "$newpath"
        chown hoaquynhtim99:hoaquynhtim99 "$newpath"
    else
        echo "This file has been backed up"
    fi
    echo ""
done

echo "End"